In order to save time, rather than manually extruding polygons, the head is made by creating a sphere and using the scale tool to size and squash it to fit the general shape of the head. It is important that the sphere be rotated so the triangles of the mesh are on the side. This is because any shape other than a quad in the mesh will cause issues such as pinching when using the turbosmooth modifier. The triangles on the side will shortly be deleted so they won't cause any problems. Once the general size and shape has been made, it should look something like this:
Next, any unneeded faces on the sphere will be deleted. The side, bottom and front of the sphere are not needed so only the top of the head flowing round the back are left over.

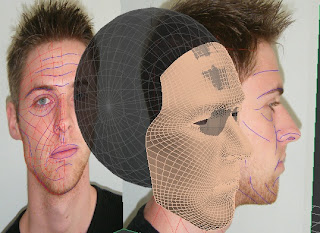
With this done, it is back to the familiar method of selecting an edge in sub-object mode, holding shift and dragging to create faces. The side of the head must now be filled in, and the neck can be extended down to make some shoulders. Once the faces are out, the vertices must be welded together to create one solid shape. There should now be some thing like the image below where there is the mask from before, and the new head / shoulder mesh as a seperate object. Details can be added here such as an indent for the clavicle, the centre of the neck and a protrusion for the throat.


Once the head a neck has been modelled, it must be attached the the mask to make on solid object. This is done by activating the mask, going into vertex sub-object mode, right-clicking a vertex and selecting attach. By then clicking the head / shoulders mesh, it will attach and turn into one shape. The now redundant vertices where the mask meets the head need to be welded.

Now it has been attached as one shape, the modifiers that were on the mask now apply to the whole object, so the whole object is turbosmoothed and this stage is complete.

No comments:
Post a Comment