Friday 28 October 2011

Finchingfield Guildhall

Now the 3D head model is complete, work has begun on the next project. For now, my current objective to reach for the group is to model the exterior of the guildhall as it will look after renovations.

I began creating the reference plates from the architect's drawings. After lining them all up in Photoshop, they looked like this:


This image was then taken into 3DS Max and, using the UV Mapping modifier, was positioned on four different planes.


Having started this project once before already, using inferior reference images, I knew that it was better for me to start in a different place. First time around I began from the front wall. This time I went for the roof. It was created using a box converted to an editable poly with the other side extruded out of it. The chimney is a separate object and was shaped by extruding the ridges around the sides outwards.


The walls were then built in a similar way, extruding shapes from an editable poly box.


The wooden supports were also made from new shapes and the edges were chamfered to make them less sharp.


After initially using pro-boolean to create the gaps for the windows, I decided to start again. After using pro-boolean and then converting it back to an editable poly, lines were cut everywhere on the model. The shapes were no longer neat quads either. I rebuilt the walls and left the gaps for the windows as I extruded and welding vertices where necessary to reconnect faces.

Just as a quick exercise in applying a bitmap to a shape to break the monotony, I recreated the lottery funding sign and positioned it on the building. 


This is my progress so far, and much more will be to come. Also as an added bonus, I think I will be coming back to my 3D head and continuing to model the whole body so it can be used as a character in this animation. We've got our work cut out for us!


Wednesday 19 October 2011

Morph Targets

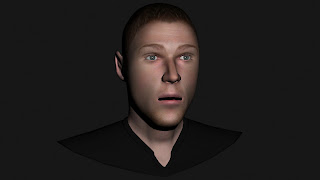
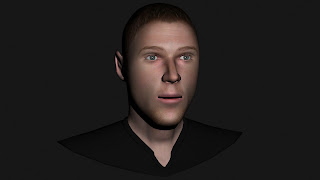
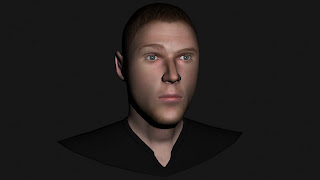
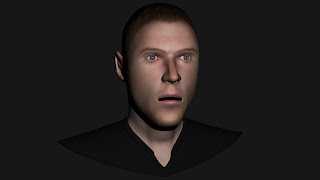
The model is complete, but to give it even more life, some facial expressions are necessary!

Firstly, the Hair and Fur modifiers are removed. These modifiers can be added again after the process. Next, right-clicking on the model and going to convert to > editable poly will prepare it for morphing. Now clone the object a few times. The more you have, the more possibilities for expressions there are. Choosing one facial movement at a time, alter one model. For example, one clone can have its mouth wide open, another can have the corners of the mouth turned up and another can have a raised eyebrow.

Be sure to leave the original model alone. This model now has the 'morpher' modifier added to it's stack. In the parameters, selecting 'pick objects from scene' will allow the clones to be chosen. Assign one clone to each slot and it will then turn active. The clones can now be hidden, and using the sliders in the morpher modifier, the facial expressions will 'tween'. Playing around with the sliders creates some amusing expressions...

Surprise

Happy (ish?)

Quizzical?

Disgust

"Oh really?"
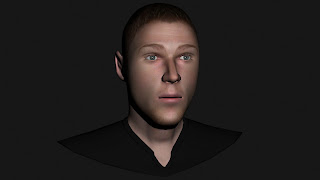
And there it is, a complete model that can also be animated. To go even further, teeth could be added and of course the whole body could be modelled but, for now, this is where this project ends.

Eyes are Important!

In the earlier stages of my model, all I had for eyes were two spheres with bitmaps assigned to them. This did the job for filling in the space, but did leave the model feeling rather dead. The bitmap was crudely created using a photograph of my iris and some quick Photoshopping.


After doing a little research into how more realistic eyes are built, it turns out it is better to make them more or less anatomically correct. This meant modelling the eye, the iris and the lens. The eye shape was made from a capsule shape that had been edited so there were no triangles in the geometry. The front was then flattened where the iris map would go. The lens was then made by squashing a smaller sphere and placing it in front of the eye.

In the image below it is clearer how the eye has been put together. The lens becomes much clearer after rendering.


Using arch & design materials gave them better reflectivity and used Fresnel reflections making the eye look more alive. The same bitmap was used for the iris as before. The lens was then made almost transparent which completed my eye v2.0!

Looking like me?

After doing this part, I found that it only takes a slight change to a face to make it look quite different. The main areas I changed were the shape of the eyes, the shape of the cheeks and the definition of the chin. Just spending a lot of time orbiting the model and looking for areas to tweak eventually resulted in an improved representation of me.

After making so many tweaks, it had stretched my colour map quite a lot. In the end I decided to redo the colour map with the new UVW rendered template. After doing it once before it was much faster to redo.
This had a knock-on effect to my bump map also which was redone. I left the specular map as the old one because any differences on that were not noticeable.

Redoing the colour map allowed me to go back and adjust some of the mapping too. Before, I found the eyebrows in particular quite stretched so I paid attention to this area when changing mapping coordinates. This resulted in a higher resolution eyebrow that was a much better shape.

Finally, the Hair and Fur modifier was applied to the top of the head. The hairs were cut, coloured and styled appropriately.

Below shows the original image and my final model!


Eyelashes

Before I get into improving the likeness to myself, i'm going to add to the general effect by applying some eyelashes.

I created these by selecting edge of one eyelid and clicking 'create shape from selection'. This created a shape that is exactly the same curve and size of the eyelid where the eyelashes will go.


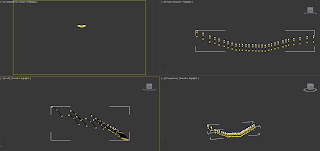
This new shape is then duplicated twice to make 3 rows. Using the refine tool, more vertices are added. The lashes are more densely packs at the centre, so more are placed there. Lastly, lines are then created across the 3 rows with snaps activated. The now unneeded 3 rows are deleted and they look like the image below.


A dark brown material and a gradient falloff was applied. When they are rendered, the gradient map works well.


Below shows the lashes before and after rendering;


On the model, they are a subtle addition but help the overall look. The same method was applied to the top lashes, then both sets were cloned and mirrored to the other side.


Now onto making it look like me finally...

Making Adjustments

Adding a backdrop and a light source improves the image nicely. I have also added clothing to the model by copying the whole model, deleting the unneeded faces and then moving the vertices around to create a better shape. The remaining mesh is then scaled slightly larger so it fits over the shoulders of the original model.


Using the WSM Hair and Fur modifier, a little bit of facial hair has been added too. I'm still not happy with the likeness to myself and I think I am going to need to adjust quite a few of the facial vertices to achieve this...

Making the Specular Map

Not only is skin not perfectly smooth, but it is also shinier in some places more than others. A specular map can be created to improve the realism. Using a copy of the bump map from before, using image > adjustments > levels, it has been made much darker. A soft brush is then used to paint white onto the parts of the face that should be shiny. The forehead, chin, cheeks and lips are often touched by the hands making them greasier, therefore shinier.


With the relevant places made whiter, it is then blurred by going to filter > blur > gaussian blur.


Back in 3DS Max, this new image is applied to the specular parameter in the maps rollout in the skin material. The images below show the model with all of the required steps complete.


Bump map

The colour on the model is done, but it isn't realistic enough. Skin isn't perfectly smooth, so using a bump map we can create the illusion of a less perfect surface. Below shows a closer view of the model with just the colour map as a point of reference.


Using a copy of the colour map from before, it is desaturated by going to image > adjustments > desaturate. The levels are then altered by going to image > adjustments > levels. This makes sure the blacks and whites are represented fully in the image. Next, a high pass filter is applied by going to Filter > Other > High Pass. Using the clone stamp tool, the ridge around the edge should be removed to prevent a ridge on the model.


Back in 3DS Max, the bump map image is placed in 'bump' on the maps rollout of the material applied to the head model.


The image above shows that the bump map alone is too strong. We can 'dilute' the amount of bumping by mixing it with some noise. Applying 'mix' to the bump rollout instead of the jpeg allows this. Within mix, one is set to 'noise' and the other is set to the bump map image. A slider allows the two to be merged to varying degrees. The images below show a good mix.


Finally, more detail can be added by painting white for raised areas such as hairs / moles etc and painting black for indents like wrinkles.


Here is my model with the colour and bump maps applied.


Continuing with the Texturing

Carrying on from the previous post, more sections are copy & pasted from the original photos to my texture map.


Eventually, I reached a stage where all of the components were in place and were ready to be blended in with each other to form one solid texture. There were still blank spaces between components that needed filling and this was done with the clone stamp tool.


As each component is still a separate layer, they can individually be colour-adjusted to match components next to them better. This is done with hue / saturation / lightness alterations using the sliders. Once they are more or less a similar colour, the layers can be merged ready for the patch tool. The patch tool is used by creating a ring around a transition line and it then blends them together to make the joint a lot less obvious. After using a combination of colour adjustments, clone stamping and patching, my model is coming along nicely.


Just to make it that little bit creepier, the eye holes are filled in with a deep red so the inner eyelid has a red tint to it.


This is the colour map complete. All that remains is the bump and specular maps, both created from this map. More on that in the next post...