Tuesday, 27 September 2011

Aligning the profile

Now that the side of the face is marked out and created as a 2D object, it can be aligned to create a rough 3D face. Going column by column with the vertices, they can be pulled out the create the 3D form by matching their position to where they should be in relation to the profile reference plate. By pressing alt+x with the object selected, the reference picture can be seen behind it. The images below show my progression through this procedure.


The eyes, nose and mouth are left unfinished as they require a little more detail and shaping. I will do these later. Now the basic shape has been made, adding a symmetry modifier will complete this stage. By using the 'make planar' option in the sub-object vertices parameters, the joining line of vertices will be welded to the new side, making it a tidy and complete mesh.


The image above highlights the issue I mentioned in a previous post. The front viewport shows how my face was facing slightly to the side in the photo, but the mesh is perfectly straight. It has given the effect of the mesh being wider than my face. This is not too problematic, but adjustments will need to be made to compensate. 

The face mesh is then improved further by adding a Turbosmooth modifier to the stack.


It doesn't look like me yet, but there's a way to go...

Beginning the topology

By selecting Shapes > Splines > Line, the topology can be prepared. Make sure both line options are set to 'corner' in the parameters before starting. It is a bit of a tedious process, but not challenging as the thinking part was done with the red brush in Photoshop. Turn on the 'Snaps' tool and set it to 'Vertex' only. The image below is what my model looked like after creating all of the shapes. Some quads have been simplified from the red quads to make less work during the conversion to 3D later.


By selecting one of the quads and changing it to an editable poly, it changes to a surface. Now, with sub-object vertex selected, right click a vertex and select attach. Select all of the other shapes. It should look something like the image below. Highlight all vertices, and press the little square next to the weld option. This will weld all of the unneeded points to form one tidy mesh.


Yes, it does look pretty creepy. Function before form!

Making reference plates

With the images from the previous post ready, they can be put into 3DS Max. Firstly, make a plane in the front view to the rough proportions of the face-on photo. Press M to open the material editor and assign the Photoshop image to the plane as a bitmap. Now apply the UVW Map modifier. Select 'Fit Bitmap' from the parameters and select the same Photoshop image. The plane should now have the face-on and profile image assigned to it. Use the gizmo to 'scroll' the image so only the face-on image is visible.

Select the rotate tool, hold shift, and rotate the plane 90 degrees. This should create a second plane with the same image. Use the gizmo again to scroll the image so the profile view is showing.


Position the planes so your model can be made in the middle. In the image above, the face-on image needs to be pushed backwards out of the way. Right click each plane and select 'Object Properties'. Select 'Freeze' and unselect 'Show frozen objects in grey'. This will make the planes unclickable (therefore you can't accidentally move them). Modelling can now begin.

First things first.

Here we go with the first assignment of Year 3. Modelling my own head using 3D Studio Max and a bit of Photoshop. It should be good...

All future blog posts regarding the head model will have been written by me as I work my way through the video tutorials by Eric Maslowski at http://cg-india.com/tutorials/3dsmax_tutorials_organic_modeling.html.

In order to have a high quality, natural looking end result, we must have well aligned reference plates of the subject. As the subject will be my own head, two photographs were taken. One from the front and one from the side.
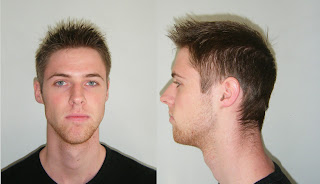
That'll make a good passport photo.

The image above has had a little work done to it to prepare it for reference.  I'll outline these changes below.

Firstly, most cameras will create a bulge effect on the photo. This can be due to the angle the photographer is standing at in relation to the subject. To remove this, we take each image into Photoshop, go to Filter > Distort > Lens Correction. Move the 'Remove Distortion' slider to the right a bit to flatten the image. If you feel the photographer had the camera tilted up or down, the 'Vertical Perspective' slider can help to flatten the image further. To finish with this option box, select the straighten tool and drag a line from one pupil to the other on the face-on image. This will make the image nice and straight.

Next, the profile image needs to be aligned to the face-on one. Pressing ctrl+r in Photoshop will bring up the rulers. Drag some horizontal rulers down to key features on the face such as the pupils, bottom of chin, peak of eyebrows and the centre of the mouth. You can now align the profile image using these. Scale and rotate the profile image as necessary using the free-transform tool on ctrl-t.

The next step is to mark out the contours of the face to make the facial topology clear before modelling. Using a blue brush, I have marked out all of the key features of my face in a way that shows the organic flow. Now, using a red brush, I have marked the topology of my face. This is how I will build the structure in 3DS Max.


I did find the initial marking out of the topology very difficult. I kept getting stuck on how to keep them all quads and to see the flow properly. So I gave up, eventually returned to it the next day with a clear mind and it wasn't very difficult the second time round. For the profile image, only the blue guidelines will be needed.


Now my photos are ready to be made into reference plates. They are acceptable images, but the face-on image is not perfect. You will notice the ear on the left is out further than the right. While humans aren't symmetrical, my ears aren't that lopsided! This was me not facing the camera straight on. I will manage, but I may need to compensate for this on my model later on.

Friday, 23 September 2011

Assignment Brief Reflection

Task 1 - Building our own head in 3D Studio Max.

This initial task will be an interesting and enjoyable one for me. I have built two human heads before in 3DS Max, and hopefully this third will be a noticeable improvement over the previous ones. The ones I did before were definitely lacking quality, but with considerably more 3D experience this should be good. I am looking forward to working on this project and hope the quality of the final outcome will reflect my enthusiasm for the module.


Task 2 - Producing an animation of Finchingfield Guildhall as part of a group.

I am not sure what to expect from this project yet, but I think visiting the town will help greatly.  It will be interesting to see how a group will come together to produce a complete animation. I feel comfortable with the modeling aspect of this project, but have not yet had many ideas as to how to animate this with an interesting narrative. Again, the visit should help with this problem a lot.

Overall, I am looking forward to working on this, as I have done with previous 3D modules.